Monday, February 7, 2011

Combine fact at 2 levels - Base and aggregate fact

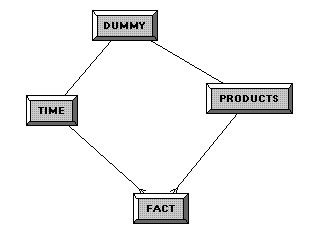
        Lets now see how to combine data from 2 facts which are at different levels. i.e consider the following dimensions product, time and a fact. The fact has records at day level for each of the product. There is also another aggregated fact at the month level. The reports, when they query for a monthly or a yearly report, it would be beneficial to hit the aggregated fact rather than the day level fact for improved performance.

      To model this, have a time dimension aggregated at the month level. (i.e) for ex -

        Import this table into the physical layer and pull into the BMM layer as below.
     Import the aggregated fact into the physical layer and into the BMM layer as below.

     Go to the content tab of each of the LTS of the both the time dimension and the fact and set the levels to each of them as below.In the time dimension, for the aggregated dimension, set it to the level of Month so that when a report queries at month level or higher, this dimension is used. Similarly for the fact aggregate, set it to Month level for the Time dimension as below. For the base level time dimension and fact, set it to the leaf level (day) in this case.
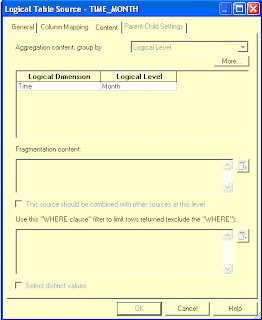
 For aggregated fact,

 For base time dimension
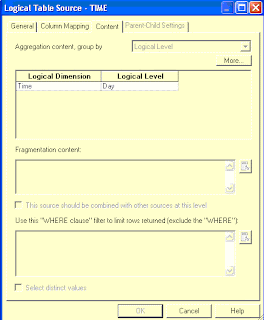
   For base fact,
 
Now when the reports are generated with the month or a level greater then month included in the report, it would hit the month aggregated and fact aggregated tables. Only when a report uses the date (day level data), the base fact would be used. Thus the performance is improved.

Tuesday, February 1, 2011

Outer Join in BI EE with 'where' clause

          I had a requirement from a customer who wanted to see for a particular year, the sales for all the months for a given product. However, the fact had data only for products that were sold in some months in a year (i.e not all products were sold across all the months in the year). The customer wanted to see a null record for those months, for those products in the report.

       To be able to produce a report that will have sales for all months in a year even though sales dint happen for a few months, we can do an outerjoin to get the desired result. But, the moment, we add a filter clause (like product name='DVD Player' or year = 2010), the result will not have rows for all the months. Instead it will only produce results for the months that has data. This is not what we want. Inorder to solve this, we will have to trick OBI EE to build a cartesian product and then to return the data for all months even with the filter.

     Lets first consider the below example wherein i have 2 dimensions (product, time) and a fact at day level data.


     Inorder to achieve the above report, we introduce another table called Dummy. This table can have only one column with value 1 populated in it as below.
In the physical layer, join the dimensions product and time to this dummy table as follows. Make a complex join between the dummy and the dimensions with the condition as 1=1.


      Pull the dummy table to the BMM layer and it would look as follows: (This can be the normal inner join between dummy and the dimensions). However the products and fact would have a outer join. Likewise the time and fact would have an outer join as well.


and likewise between time and fact. (i,e they will have an outer join). Set the aggregation for the dummy column as sum.Add the dummy table to the presentation layer and we can test the results.In all the reports, pull the dummy column and add the filter (dummy is not null) to achieve the cartesian product.

Build a report by pulling in the product, time and sales columns. Add the following filter criteria to it.

when the results are viewed, we get the desired results.


Set the value to a session variable from the dashboard URL in 11g

        Let me now blog how to set the value to a session variable in 11g from a dashboard URL. This is done in a way different from 10g.

       Create an initialization block to assign a row-wise initialization variable as below. Assign any dummy value to it. This is the value that will be set from the URL.


  Go to the actionschemas.xml file located in 'C:\BIEE11g\Oracle_BI1\bifoundation\web\display' where BIEE11g is my BI home folder. Between the

<AuthenticationSchemaGroup>
<!-- Group for HTTP POST login -->
<AuthenticationSchemaGroup>
tags

add the below line
 <RequestVariable source="url" type="informational" nameInSource="DSN" biVariableName="NQ_SESSION.DSN"/>

        Save and then restart the BI services. Now, we can test this by passing the value of the variable as below.
1) from dashboard URL :
http://vsethura-idc:9704/analytics/saw.dll?Dashboard&DSN=set_from_url
or
2) from GO URL:
http://vsethura-idc:9704/analytics/saw.dll?GO&Path=/shared/Blogs/SessionVariable_GoURL/Sessionvariable&NQUser=weblogic&NQPassword=welcome1&DSN=set_from_url

Login to OBI EE, and create the following report

Add a column with the column formula as below:


and save the report as sessionvariable. When the results are viewed, it is as below:
Thus we can set the non-system session variable's value via URL. However, we cannot set the USER , PASSWORD variable this way.


Monday, January 10, 2011

Refresh Dashboard Automatically

                Lets now see how to refresh a dashboard page automatically once in every few seconds. This will refresh the entire page ofcourse. If you would want to refresh a part/ section of the page containing a report, then check this link.
                Go the 'Edit Dashboard' and beneath the reports, add a section with a 'Text' dashboard object inserted into it. In the Text, enter the below code as follows.

<META HTTP-EQUIV = "REFRESH" CONTENT = "3">
<META HTTP-EQUIV="CACHE-CONTROL" CONTENT="NO-CACHE" >
     
          This will refresh the page automatically in 3 seconds.

         You can then format the section to remove the borders and to turn off 'collapsible'.


         Now, when we save and see the dashboard, it will refresh the page every 3 seconds.

Friday, January 7, 2011

Automatic partial page refresh in OBI EE - Dashboard

      I had a customer query asking if it possible to refresh a portion of the dashboard automatically once in 3 seconds. The answer is pretty much yes using a java script. I shall blog about that now.

    Lets take the sample report below which we would want to refresh every 3 seconds in the dashboard page. The report should refresh for the corresponding year chosen as the prompt.Lets take the following report for example.

        Based on the year selected, the products and their revenue should be seen. The other requirement is that this report should automatically get refreshed once in every 3 seconds. Inorder to achieve this, first enable the 'Refresh' link to this report by going to 'Edit Dashboard'. Go to the report section and choose 'Report Links' as shown below.

Click on OK and save and Run.The Refresh link will now be available beneath the report in the dashboard. Right click the link and 'Copy Shortcut' to get the link and paste it in a notepad as follows:


On pasting in a notepad, the script should look something like this.

Now, use the above script and write the below java script.

<script>
function  partialRefresh(){
HereLink('d:dashboard~p:iid0novn57ohc76k~r:ou0jgrg1b4vgru0m','Refresh'); } setTimeout( "partialRefresh()", 3000  );
</script>

Edit the report and add a static Text view below the report. In the static text view, paste the above code and check the 'Contains HTML Markup' checkbox as below.
When you save it, it is as follows.


Save the report and the steps are done. Thus only a single report can be automatically refreshed every few seconds.


Monday, December 13, 2010

Customize look and feel of OBI EE 11g - user customisation

     In the previous blog, I had written how to change the look and feel of OBI EE 11g. Now, lets see how to customize it for different users. (i.e) each user when he logs in will see a different logo and will have different background color, etc.Inorder to achieve this, we should use something called a 'SKIN' session variable in 11g.

     Create a table in the back end to store user name and skin name. Note that, the folders used to store these customisations begin with s_ and sk_. The skin_name that needs to be stored in the database should be without 'sk_'. See in the below table, the skin_name is only 'blafp' whereas the folder name will be 'sk_blafp' and 's_blafp'.


     In the BI Administrator, go to Manage --> Identity menu and add a system session variable called 'SKIN'.


Assign an initilialisation block Get User Skin with the initialisation string  as follows:


Then, in the path -- C:\BIEE11g\instances\instance2\bifoundation\OracleBIPresentationServicesComponent\coreapplication_obips1\analyticsRes, copy and paste the existing folders s_blafp and sk_blafp into s_new and sk_new.Hence we will now have 4 folders 2 for each of the users. Then, change the logo and other background colour, etc for each of the user as needed under the folders. Please refer to my previous post for customising the same. Then, restart the services and when the user logs in, he would have his own customized look and feel.

Lets check the results. When user1(marty) logs in, this is what he would see.


When user2 (agreen) logs in, this is what he would see.

Thursday, December 9, 2010

Customise look and feel of Oracle BI EE 11g

Lets now see how to customize the look and feel of Oracle BI EE 11g. By this, I mean, changing the 'sign in' page colour, the logo and the background colour after signing in.

       There are lot of documents specifying about this customization in a different manner. But, with these simple steps, one can change the look and feel.

       First, copy the 2 folders s_blafp and sk_blafp from C:\BIEE11g\Oracle_BI1\bifoundation\web\app\res to C:\BIEE11g\instances\instance2\bifoundation\OracleBIPresentationServicesComponent\coreapplication_obips1\analyticsRes.

       Change the logo in 2 places in the sk_blafp folder. The first place is in 'b_mozilla_4' folder (i,e C:\BIEE11g\instances\instance2\bifoundation\OracleBIPresentationServicesComponent\coreapplication_obips1\analyticsRes\sk_blafp\b_mozilla_4). The second place is 'login' folder (C:\BIEE11g\instances\instance2\bifoundation\OracleBIPresentationServicesComponent\coreapplication_obips1\analyticsRes\sk_blafp\login). Create a new logo as per this dimension ~(119 * 25). Name this logo as Oracle_logo.png. Copy and paste this logo in the above 2 places replacing the already existing Oracle_logo.png.

       You can change the background colour in the 'login.css' under C:\BIEE11g\instances\instance2\bifoundation\OracleBIPresentationServicesComponent\coreapplication_obips1\analyticsRes\sk_Eden\login and 'home.css' under C:\BIEE11g\instances\instance2\bifoundation\OracleBIPresentationServicesComponent\coreapplication_obips1\analyticsRes\sk_Eden\b_mozilla_4.

Make an entry in instanceconfig.xml as below
<UI><DefaultSkin>blafp</DefaultSkin></UI>

 Restart all the services including weblogic server. The new look and feel should appear when the services are up as below.